服务器配置如下
四台服务器安装的都是 Debian13 系统
安装tailscale
# 安装tailscale
curl -fsSL https://tailscale.com/install.sh | sh

# 假如缺少gpg curl
sudo install gpg curl -y
然后注册并登录tailscale(这里就不细讲了)自行搜索
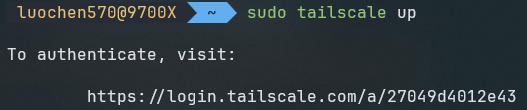
# 每个服务器节点登陆tailscale
sudo tailscale up
如下图所示 复制网址在浏览器中打开登陆 Tailscale
设置节点 Tailscale IP
找到对应的节点点击右侧三个小点 ··· 选择 Edit machine IPv4… 设置节点的 Tailscale IP
安装k3s
安装第一个节点 server-zen
curl -sfL https://rancher-mirror.rancher.cn/k3s/k3s-install.sh | \
INSTALL_K3S_MIRROR=cn \
K3S_NODE_NAME=server-jz2 \
sh -s server \
--embedded-registry \
--data-dir /www/k3s \
--cluster-init \
--node-ip=100.100.1.13 \
--advertise-address=100.100.1.13 \
--tls-san=100.100.1.13 \
--tls-san= < Agent-ali 的公网IP > \
--vpn-auth="name=tailscale,joinKey=tskey-auth-kvPHpHB15v11CNTRL-oHYczz6PxJTbsJmDayxNKTCaYxvnEaFS"
详细解释一下这些参数是什么
指定节点名称
K3S_NODE_NAME=server-jz2由于国内网络环境比较差 这里使用加速源安装K3S:
curl -sfL https://rancher-mirror.rancher.cn/k3s/k3s-install.sh | INSTALL_K3S_MIRROR=cn sh -由于网络环境不好,启用k3s 内置的无状态集群本地 OCI 注册表镜像 只需要有一个节点拉取到镜像其他节点就可以使用
--embedded-registry设置 K3S数据目录为 /www/k3s/ 防止日志爆破系统盘
--data-dir /www/k3s 高可用 etcd集群
--cluster-init指定 节点IP 和k3s广播IP 为 Tailscale IP
--node-ip=100.100.1.13
--advertise-address=100.100.1.13
配置固定的注册地址 可以外网直接访问集群
--tls-san=100.100.1.13 \
--tls-san= < Agent-ali 的公网IP >
与 Tailscale VPN 集成
--vpn-auth="name=tailscale,joinKey=tskey-auth-kvPHpHB15v11CNTRL-oHYczz6PxJTbsJmDayxNKTCaYxvnEaFS"稍等片刻 服务就会启动了
接下来安装其他节点
首先获取token
y
# 节点 server-jz
curl -sfL https://rancher-mirror.rancher.cn/k3s/k3s-install.sh | \
INSTALL_K3S_MIRROR=cn \
K3S_NODE_NAME=server-jz \
sh -s server \
--embedded-registry \
--data-dir /www/k3s \
--token < K3S Token > \
--server https://100.100.1.13:6443 \
--node-ip=100.100.1.12 \
--advertise-address=100.100.1.12 \
--vpn-auth="name=tailscale,joinKey=$AUTH-KEY"
# 节点 server-jz2
curl -sfL https://rancher-mirror.rancher.cn/k3s/k3s-install.sh | \
INSTALL_K3S_MIRROR=cn \
K3S_NODE_NAME=server-jz \
sh -s server \
--embedded-registry \
--data-dir /www/k3s \
--token < K3S Token > \
--server https://100.100.1.13:6443 \
--node-ip=100.100.1.12 \
--advertise-address=100.100.1.12 \
--vpn-auth="name=tailscale,joinKey=$AUTH-KEY"# 节点 agent-ali
curl -sfL https://rancher-mirror.rancher.cn/k3s/k3s-install.sh | \
INSTALL_K3S_MIRROR=cn \
K3S_NODE_NAME=agent-ali \
K3S_URL=https://100.100.1.13:6443 \
K3S_TOKEN=< K3S Token > \
sh -s - agent \
--node-ip=100.100.1.10 \
--node-external-ip=100.100.1.10 \
--vpn-auth="name=tailscale,joinKey=$AUTH-KEY"到这里我们的k3s的所有节点算是ok了
接下来我们开始换源 防止拉取不下来镜像
sudo mkdir -p /etc/rancher/k3ssudo nano /etc/rancher/k3s/registries.yamlmirrors:
docker.io:
endpoint:
- "https://docker.1ms.run"
- "https://docker.xuanyuan.me"
- "https://docker.m.daocloud.io"
- "https://docker.chenby.cn"
- "https://registry.aliyuncs.com"
- "https://mirror.ccs.tencentyun.com"
- "https://hub.luochen570.top"
quay.io:
endpoint:
- "https://quay.m.daocloud.io"
- "https://quay.tencentcloudcr.com"
- "https://quay.registry.cyou"
- "https://quay.chenby.cn"
- "https://quay.luochen570.top"
registry.k8s.io:
endpoint:
- "https://k8s.m.daocloud.io"
- "https://registry.aliyuncs.com/google_containers"
- "https://registry.lank8s.cn"
- "https://lank8s.cn"
- "https://k8s.registry.cyou"
- "https://k8s.chenby.cn"
- "https://k8s.luochen570.top"
k8s.gcr.io:
endpoint:
- "https://k8s-gcr.m.daocloud.io"
- "https://k8sgcr.registry.cyou"
- "https://k8s.chenby.cn"
- "https://k8s-gcr.luochen570.top"
gcr.io:
endpoint:
- "https://gcr.m.daocloud.io"
- "https://gcr.lank8s.cn"
- "https://gcr.registry.cyou"
- "https://gcr.chenby.cn"
- "https://gcr.luochen570.top"
ghcr.io:
endpoint:
- "https://ghcr.m.daocloud.io"
- "https://ghcr.registry.cyou"
- "https://ghcr.chenby.cn"
- "https://ghcr.luochen570.top"分别重启server节点和agent节点
# 重启 server节点
sudo systemctl restart k3s
# 重启 agent 节点
sudo systemctl restart k3s-agent
测试安装结果
# 复制 KUBECONFIG 文件
cp /etc/rancher/k3s/k3s.yaml ~/.kube/config
# 当然也可使用环境变量
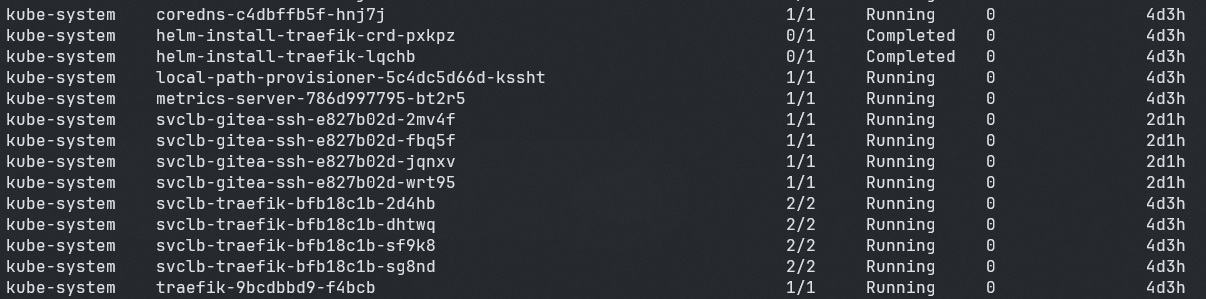
export KUBECONFIG=/etc/rancher/k3s/k3s.yaml# 检查pod是否启动
kubectl get pods --all-namespaces一般像下图这样就ok了